
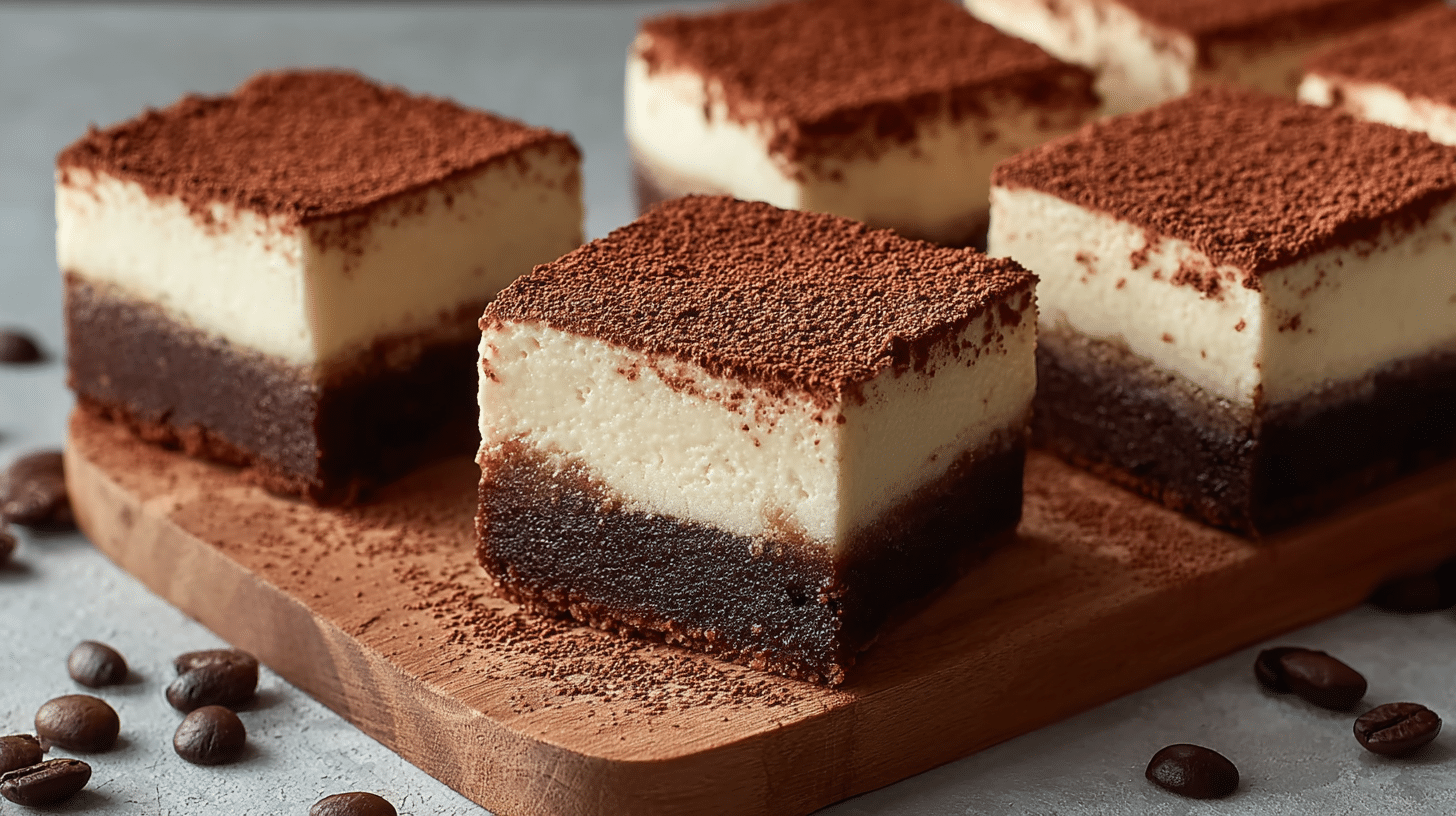
Luxuriously fudgy, delicately creamy, and infused with bold espresso aroma, Tiramisu Brownies deliver the best of two beloved desserts in each decadent square. The base tastes like a dense, chocolate-forward brownie, while the topping brings that unmistakable mascarpone and coffee flavor that defines tiramisu. These Tiramisu Brownies stand out because they celebrate contrast: hot and cold, bitter and sweet, creamy and chewy. Dessert lovers appreciate how they turn everyday ingredients into something restaurant-worthy with very little effort. You’ll learn how to bake a perfectly rich brownie layer, create a cloud-like mascarpone topping, infuse authentic coffee flavor, and slice with bakery-level presentation.
Why You’ll Love This Recipe
Dessert mashups rarely strike the right balance between creativity and flavor, but Tiramisu Brownies nail it. The brownie base tastes intensely chocolatey thanks to melted chocolate and cocoa powder. Its texture is dense and chewy, offering satisfying bite and structure. Layered on top is a silky mascarpone cream that captures everything we love about tiramisu: espresso, vanilla, and a gentle tang softened with powdered sugar. The textures together rival anything from an upscale bakery, yet the process remains streamlined for home bakers.
Flavor complexity is another reason you’ll love these brownies. The coffee flavor cuts through the richness of chocolate, while mascarpone adds a cool contrast against the warm, baked brownie. That interplay transforms these squares into something more grown-up than a classic brownie, similar to how an espresso chocolate dessert brings sophistication to a dinner spread. They’re also reliable: the batter mixes by hand, the topping spreads without fuss, and the final bake requires minimal monitoring. Even novice bakers find success.
Finally, they feel versatile. Serve them warm with ice cream for gooey indulgence. Chill them for clean slices at parties or potlucks. Style them with cocoa dusting for holidays. However you serve them, they look striking and taste unforgettable.
Ingredients
These measurements are optimized for a 9×13-inch (23×33 cm) pan, yielding about 16 generous squares. For the brownie base, you’ll need 8 oz (225 g) semisweet chocolate chopped, 1 cup (230 g) unsalted butter, 1 1/2 cups (300 g) granulated sugar, 1/2 cup (110 g) brown sugar, 4 large eggs at room temperature, 1 tbsp vanilla extract, 1 1/4 cups (155 g) all-purpose flour, 1/2 cup (50 g) cocoa powder, 1 tsp fine salt, and 1 tbsp instant espresso powder dissolved in 2 tbsp hot water.
For the mascarpone layer, you’ll need 8 oz (225 g) mascarpone cheese, 8 oz (225 g) cream cheese softened, 1/2 cup (60 g) powdered sugar, 1 large egg, 1 tsp vanilla extract, and 1 tbsp strong brewed espresso. Finish with unsweetened cocoa powder for dusting.
Mascarpone provides authentic tiramisu flavor, cream cheese helps with structure, and espresso enhances overall depth. Using both granulated and brown sugar keeps the brownies chewy and moist. The cocoa powder intensifies chocolate flavor without extra sweetness, while instant espresso ensures the coffee note shines.
Pro Tips
Mastering Tiramisu Brownies comes down to three essential techniques. First, melt the chocolate and butter gently using a double boiler or microwave in short intervals. Overheating can cause chocolate to seize, which compromises brownie texture. Stir between intervals until smooth, glossy, and fully blended. A silky chocolate base guarantees fudgy brownies.
Second, don’t overmix once you add flour. Brownies rely on minimal gluten development for their signature chew. When the dry ingredients disappear into the batter, stop stirring. Treat this step the same way you would when mixing batter for coffee cocoa bars: less agitation equals better texture and less crumbly edges. Use a rubber spatula instead of a whisk to maintain density while preventing overmixing.
Third, chill fully before slicing if you want clean bakery-style squares. The mascarpone layer needs time to set, and chilling helps flavors meld. Use a hot knife wiped dry between slices for sharp, smooth edges. If you prefer warm and gooey brownies instead, under-bake by two minutes and serve with ice cream, but expect a softer presentation. These small details make a big difference and elevate the final result from homemade to patisserie-level.
Instructions
Step 1: Prepare the Pan and Melt Chocolate
Preheat your oven to 350°F (175°C). Line a 9×13-inch (23×33 cm) baking pan with parchment, leaving overhang on two sides to lift the brownies later. In a heat-safe bowl, melt chopped chocolate and butter together using a double boiler or microwave in 20–30 second bursts. Stir between each interval until glossy and smooth.
Step 2: Mix the Brownie Base
Whisk granulated sugar and brown sugar into the melted chocolate mixture until combined. Add the eggs one at a time, whisking well after each addition. Stir in vanilla extract. Dissolve instant espresso powder in hot water, then pour into the batter. Add flour, cocoa powder, and salt. Use a rubber spatula to fold the dry ingredients in gently until just combined. Do not overmix.
Step 3: Bake the Brownie Layer
Spread the batter evenly into the prepared pan. Tap once to settle. Bake for 18–20 minutes or until the edges are set but the center still looks slightly glossy. The brownie layer should not be fully baked at this stage since it will return to the oven with the topping. Let it cool for 10 minutes on a rack while you prepare the mascarpone layer.
Step 4: Prepare the Mascarpone Layer
In a medium bowl, beat mascarpone and cream cheese together until smooth and lump-free. Add powdered sugar, egg, vanilla extract, and brewed espresso. Mix until creamy and uniform. The texture should be pourable but thick enough to spread.
Step 5: Layer and Final Bake
Pour the mascarpone mixture over the warm brownie layer. Use an offset spatula to spread evenly to the corners. Bake again for 22–26 minutes or until the center of the topping looks set and no longer jiggles. Remove pan from the oven and cool completely on a wire rack.
Step 6: Chill and Slice
Once cooled, refrigerate for at least 2 hours or overnight. Chilling sets the cheesecake-like layer, making slicing easier. Dust lightly with unsweetened cocoa powder before cutting.
Step 7: Serve and Store
Use parchment overhang to lift the slab from the pan. Slice with a hot, clean knife for neat edges. Serve cold for firm texture or room temperature for a softer bite. Each square will present a visible chocolate brownie base with creamy tiramisu top—simple yet stunning.
Variations
Tiramisu Brownies invite creativity. For a boozy twist, add 1 tablespoon of Kahlúa or rum to the mascarpone layer to mimic authentic tiramisu flavor. The alcohol cooks down slightly during baking, leaving aroma and warm complexity behind. For those who don’t drink alcohol or prefer kid-friendly desserts, stick with coffee-only espresso flavor for balance.
Gluten-free variations work beautifully with 1:1 gluten-free flour blends designed for baking. Ensure your blend contains xanthan gum for structure. Dairy-free bakers can substitute coconut cream cheese alternatives and use coconut cream plus vegan chocolate, though the result tastes more like a coconut mocha brownie than traditional tiramisu. Another idea: swirl the mascarpone topping gently into the brownie batter for a marbled effect instead of a clean layered look. It tastes the same but looks artistic and rustic.
If you like extra chocolate, sprinkle mini dark chocolate chips over the mascarpone layer before the final bake. Alternatively, top with shaved white chocolate after cooling for color contrast.
Storage/Serving
Store Tiramisu Brownies in an airtight container in the refrigerator for up to 5 days. Because mascarpone and cream cheese require refrigeration, avoid leaving squares out at room temperature for more than 2 hours. For longer storage, freeze individual squares tightly wrapped in plastic and foil for up to 2 months. Thaw in the refrigerator overnight for best texture.
Serving options vary depending on the occasion. For dinner parties, plate chilled squares with a drizzle of espresso syrup or chocolate sauce for refined presentation. For casual gatherings, dust generously with cocoa powder and serve on a platter. During summer, pair slightly warm brownies with vanilla ice cream for hot-and-cold contrast. They also shine alongside strong coffee after brunch, similar to how Italian bakeries serve tiramisu with espresso to highlight bitterness against creaminess.
FAQs
1. Do I need mascarpone, or can I substitute it?
Mascarpone gives authentic tiramisu flavor, but full-fat cream cheese works in a pinch. Expect slightly tangier results.
2. Can I skip the coffee?
Yes, replace espresso with milk or vanilla. The dessert becomes more like cheesecake brownies without the tiramisu element.
3. How do I know when they’re done?
The mascarpone layer should look matte and set around the edges. A little jiggle in the center is fine because it firms as it cools.
4. Can I make these ahead of time?
Yes. In fact, chilling overnight improves texture and flavor, making them ideal for events and meal prep.
5. Why did my mascarpone layer crack?
Overbaking or sudden temperature changes can cause cracks. Pull them out when the center barely jiggles and cool gradually on the counter.
Conclusion
This Tiramisu Brownies is comfort food at its finest — a luxurious blend of fudgy chocolate and espresso-kissed mascarpone cream. It’s the kind of dish that elevates celebrations, satisfies coffee lovers, and brings a touch of European café elegance to your home kitchen.