
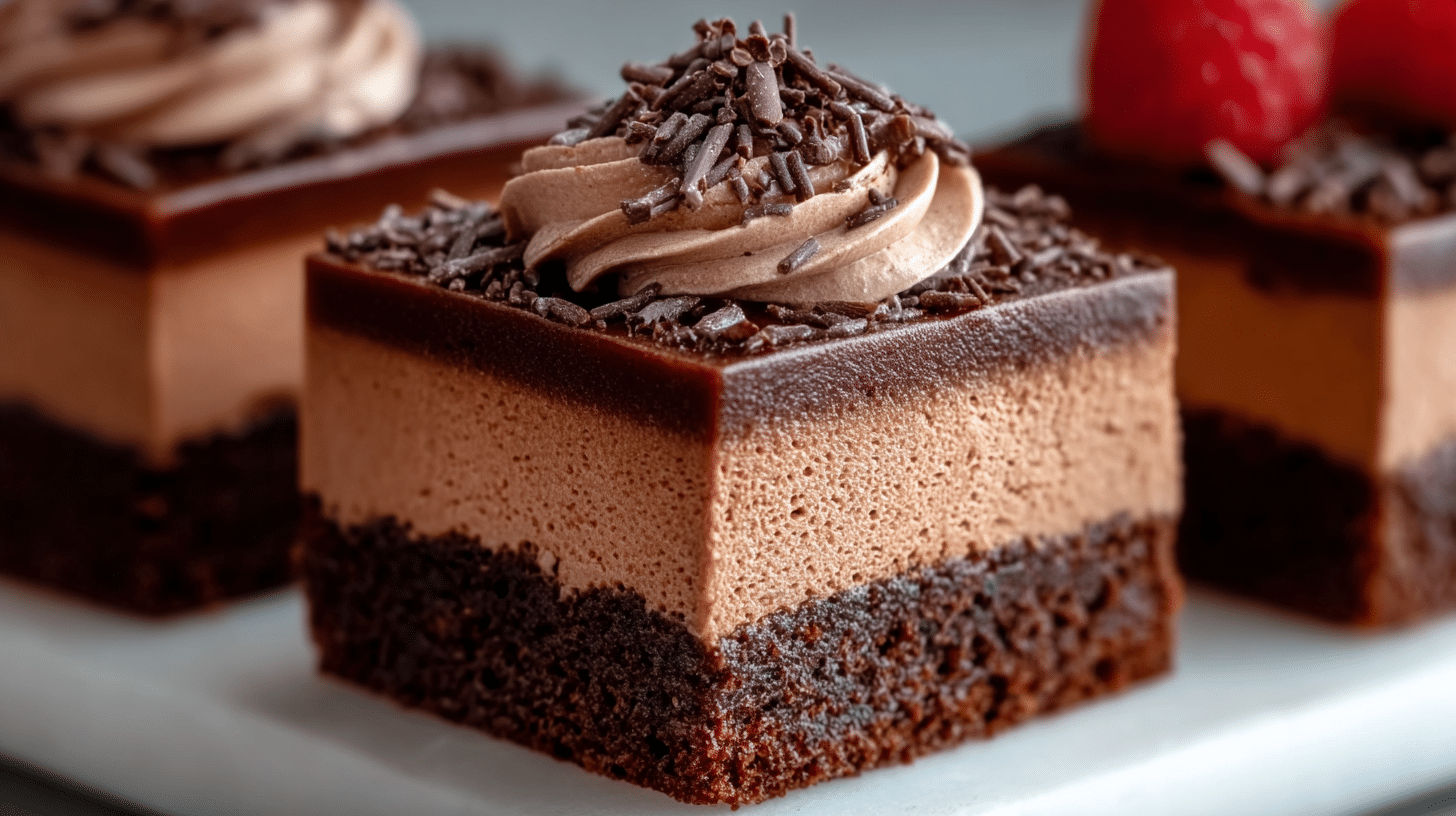
Thick, fudgy, and impossibly silky, these Chocolate Mousse Brownies deliver a two-layer chocolate experience that dessert lovers dream about. Imagine a dense brownie base topped with an airy chocolate mousse, chilled to perfection, and sliced into neat, indulgent squares. This classic bakery-style treat tastes luxurious yet feels approachable enough for home bakers. The best part? These Chocolate Mousse Brownies bring together contrasting textures that make every bite memorable. They suit holidays, birthdays, potlucks, or any moment that calls for a stunning chocolate dessert. You’ll learn how to make the brownie layer, whip a flawless mousse topping, cut clean slices, and adapt this recipe like a pro…
Why You’ll Love This Recipe
There are many reasons why these Chocolate Mousse Brownies deserve a spot in your dessert rotation. First, the flavor profile is bold and chocolate-forward without being too sweet. The base layer gives you rich chocolate intensity with slight chewiness—very similar to bakery brownies or the kind found in gourmet coffee shops. Then the mousse layer adds smooth, cloudlike texture that lightens the entire experience.
Texture contrast is a standout feature here. You get firm edges from the brownie, soft centers that sink slightly under your fork, and then a creamy, silky topping that feels like chocolate mousse cake. That dessert architecture keeps every bite interesting, and the combination appeals to anyone who loves both brownies and mousse-style desserts.
You’ll also appreciate how simple the process feels. The brownie uses one bowl and a few staple ingredients. The mousse layer requires melting chocolate, whipping cream, and folding—nothing complicated once you understand the rhythm. When chilled, the layers set beautifully, allowing you to slice clean squares for parties or weekend treats. These squares store well, travel well, and make excellent treats for gifting. If you enjoy layered dessert brownies or decadent chocolate bars, you’ll fall head over heels for this version. Ultimately, these Chocolate Mousse Brownies offer maximum chocolate payoff with minimal stress.
Ingredients
Here’s what you need to successfully make Chocolate Mousse Brownies at home, with precise measurements and brief ingredient notes. Measurements include both US and metric for convenience.
For the Brownie Layer:
1/2 cup (113 g) unsalted butter, melted – Provides richness and chewiness.
1 cup (200 g) granulated sugar
2 large eggs
1 teaspoon (5 ml) vanilla extract
1/3 cup (40 g) unsweetened cocoa powder
1/2 cup (62 g) all-purpose flour
1/4 teaspoon (1.5 g) salt
1/4 teaspoon (1.5 g) baking powder
For the Chocolate Mousse Layer:
6 oz (170 g) semisweet chocolate, chopped
1 teaspoon (5 g) instant espresso powder (optional) – Enhances chocolate flavor.
2 cups (480 ml) heavy whipping cream, cold
1/4 cup (30 g) powdered sugar
1 teaspoon (5 ml) vanilla extract
Also used naturally in the article as keyword variations: “fudgy chocolate bars,” “layered dessert brownies,” and “mousse-topped brownies.”
Pro Tips
Use these three techniques to make your Chocolate Mousse Brownies flawless every time:
Pro Tip 1: Don’t Overbake the Brownies
Brownies taste best when slightly underbaked. Pull the pan from the oven when the center still feels soft and a toothpick shows moist crumbs. Overbaking leads to dry, cakey brownies, which don’t pair well with mousse topping. Let the brownies cool completely before adding the mousse layer, or the heat will melt your whip.
Pro Tip 2: Whip Cream to Medium Peaks
The mousse layer depends on proper whipped cream. Medium peaks create structure without turning grainy or butter-like. Whip until the cream holds shape but remains soft and silky. When folding chocolate into the cream, move gently from the bottom up to keep volume.
Pro Tip 3: Chill Before Slicing
Chilling is the secret to clean edges. After spreading the mousse onto the brownie layer, cover the pan and refrigerate for at least 3 hours. This firms both layers, making slicing easier and improving texture contrast. Use a heated knife (dip in hot water and dry) for the cleanest cuts.
Instructions
Step 1: Prepare the Brownie Batter
Preheat your oven to 350°F (177°C). Grease an 8×8-inch (20×20 cm) baking pan or line it with parchment paper for easy removal. In a medium bowl, whisk together melted butter and granulated sugar until glossy and combined. Add eggs and vanilla extract, whisking until smooth. Sprinkle cocoa powder, flour, salt, and baking powder over the wet mixture. Stir with a spatula just until combined. Avoid overmixing—stop once no dry streaks remain.
Step 2: Bake the Brownies
Pour the batter into the prepared pan and smooth the surface. Bake in the center of the oven for 20–22 minutes. The top should look set, but the center should feel soft with a little wiggle. Check doneness using a toothpick—moist crumbs are ideal. Set the pan on a cooling rack and allow brownies to cool completely. This takes about 60 minutes. Don’t rush: adding mousse to warm brownies causes melting.
Step 3: Prepare the Chocolate Base for Mousse
Place chopped semisweet chocolate in a heat-safe bowl. Add instant espresso powder if using. Melt chocolate in the microwave using 20–30 second bursts, stirring each time, until smooth. You may also melt over a double boiler. Let chocolate cool to lukewarm—warm enough to stay fluid but not hot. If chocolate is too hot, it will deflate the mousse.
Step 4: Whip the Cream
In a large cold mixing bowl, add heavy whipping cream, powdered sugar, and vanilla extract. Using a hand mixer or stand mixer fitted with the whisk attachment, beat on medium-high speed until medium peaks form. The cream should hold shape when lifted but still feel soft and glossy.
Step 5: Fold to Create Mousse
Drizzle cooled chocolate into the whipped cream in two additions. Use a large spatula and fold gently from bottom to top with sweeping motions. Work slowly to avoid deflating the cream. Keep folding until no streaks remain. This step gives your mousse cloudlike texture while keeping structure.
Step 6: Assemble the Layers
Scrape the chocolate mousse onto the cooled brownie layer. Spread evenly using an offset spatula. Smooth the top so it looks polished and level. Cover the pan with plastic wrap and refrigerate for at least 3 hours or overnight. During this time, the mousse thickens and the brownies firm up, making slicing easier.
Step 7: Slice and Serve
After chilling, use the parchment sling (if used) to lift the dessert from the pan. Slice with a sharp knife. For perfect edges, wipe and warm the knife between cuts. Serve chilled and enjoy the dual-layer chocolate experience of your Chocolate Mousse Brownies.
Variations
These Chocolate Mousse Brownies adapt beautifully to flavor preferences and dietary adjustments:
Mint Chocolate Variation:
Add 1/2 teaspoon mint extract to the mousse layer and sprinkle crushed peppermint candies on top. This variation tastes like mint chocolate mousse cake and suits winter holidays.
Peanut Butter Swirl Version:
Before baking, swirl 1/3 cup melted peanut butter into the brownie batter. This adds nutty richness and pairs beautifully with the mousse. The result resembles gourmet peanut butter fudgy chocolate bars.
Gluten-Free Option:
Swap flour for a gluten-free 1:1 baking mix. Because brownies rely on fat and eggs more than gluten structure, the texture remains chewy and dense. Always check labels on chocolate for wheat traces if serving to gluten-sensitive guests.
Storage/Serving
Store leftover Chocolate Mousse Brownies in the refrigerator, covered tightly, for up to 5 days. Refrigeration maintains mousse structure and prevents dairy separation. Avoid leaving them at room temperature for too long, especially in warm kitchens.
These squares also freeze well for up to 2 months. Freeze in a single layer until solid, then wrap individually and store in freezer bags. Thaw slices in the refrigerator overnight for best texture.
Serving ideas:
With Fresh Berries: Raspberries or strawberries cut the richness with tart contrast.
With Whipped Cream: A small dollop adds elegance to mousse-topped brownies.
With Espresso Drinks: Cappuccino or cold brew enhances the chocolate intensity, similar to café-style layered dessert brownies.
Whether served for celebrations or casual weekends, these treats shine as a showstopper dessert.
FAQs
1. Can I use boxed brownie mix?
Yes. Prepare according to package instructions, bake in an 8×8 pan, and cool before adding mousse. Homemade gives better chew and flavor, but boxed works in a pinch.
2. Does the mousse contain raw eggs?
No. This mousse uses whipped cream rather than egg yolks or whites, making it beginner-friendly and kid-safe.
3. Can I make the mousse ahead of time?
You can, but it may firm up before spreading. For best results, make the mousse right before assembling.
4. Can I use milk chocolate instead of semisweet?
Yes, but reduce powdered sugar slightly since milk chocolate is sweeter. Dark chocolate also works for bolder flavor.
5. Why did my mousse deflate?
Most likely, the chocolate was too warm or the cream was whipped to stiff peaks. Cool chocolate and medium peaks prevent deflation.
This Chocolate Mousse Brownies is comfort food at its finest — rich, elegant, and layered with silky chocolate goodness. It’s the kind of dish that turns simple ingredients into a gourmet-level dessert that impresses at parties, holidays, or quiet nights at home.