
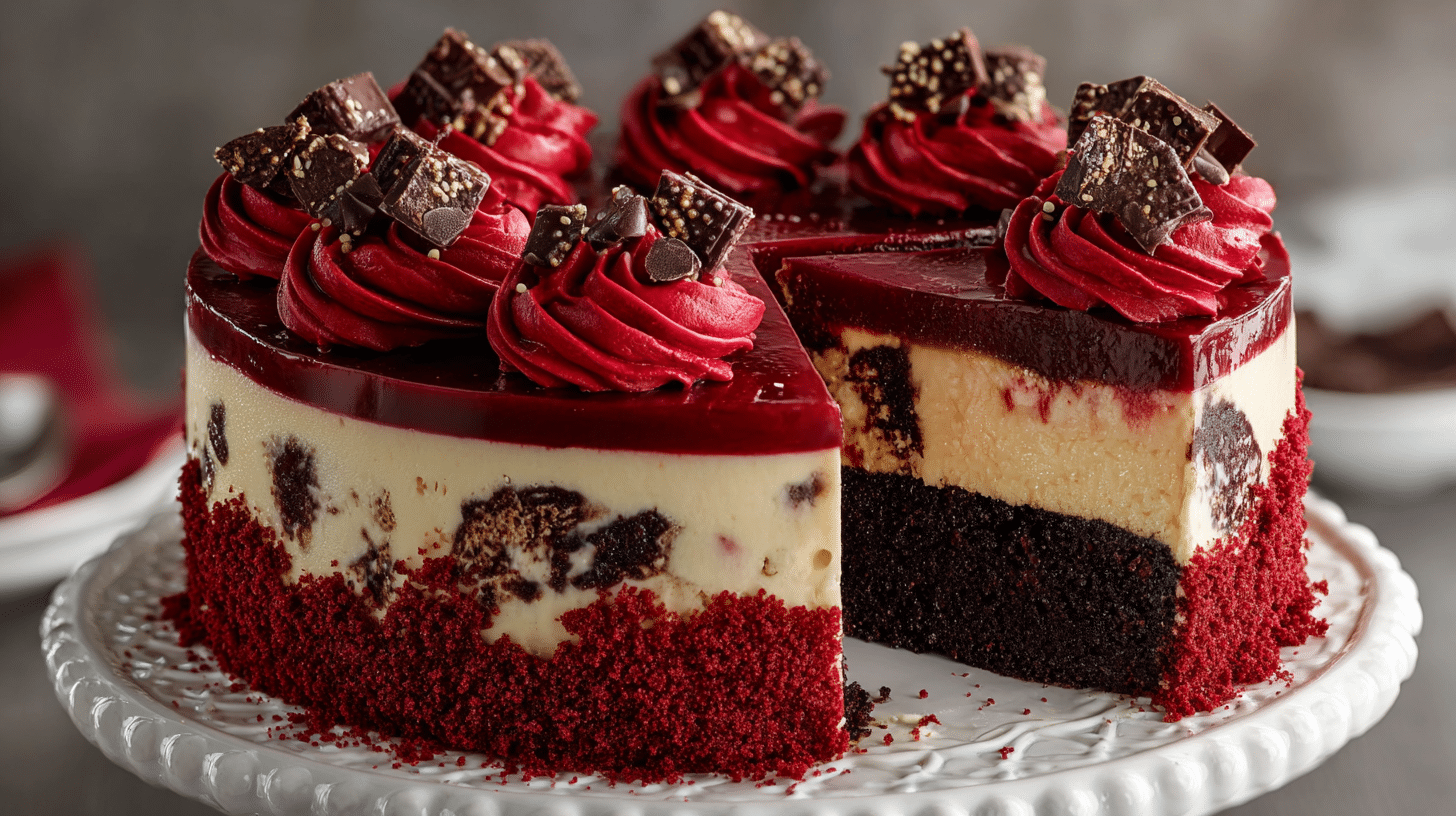
Moist, velvety, and impossibly creamy, the Red Velvet Cheesecake Layer Cake Recipe delivers a showstopping dessert with dramatic color and rich flavor. Each forkful blends tender red velvet cake with a silky cheesecake center and fluffy cream cheese frosting. This bakery-style dessert feels luxurious yet manageable at home. The Red Velvet Cheesecake Layer Cake Recipe stands out for special occasions, holidays, and birthdays because it offers visual appeal and irresistible taste. You’ll learn how to bake the layers, assemble them neatly, frost like a pro, and customize for your needs.
Why You’ll Love This Recipe
This cake checks every box for texture lovers. The red velvet layers taste moist, soft, and slightly cocoa-forward. The cheesecake tier in the middle adds cool creaminess that contrasts beautifully with the fluffy cake. Swirls of cream cheese frosting bring tang and sweetness, tying everything together without overwhelming richness. Every bite feels balanced thanks to that interplay of smooth, soft, and airy textures.
Convenience also adds to the charm. You can bake the cheesecake and red velvet layers ahead of time. Once chilled, the assembly process becomes simple. The Red Velvet Cheesecake Layer Cake Recipe works well for hosts who want to prep dessert early and still impress guests later. The look alone makes people think it came from a high-end bakery.
This dessert also suits multiple celebrations. Think Valentine’s Day, anniversaries, Christmas parties, or milestone birthdays. The bright red color and cheesecake center provide a dramatic presentation that sparks excitement. If you enjoy cheesecake red velvet layer cake desserts from restaurants, you’ll love this homemade version even more. You control the ingredients, adjust sweetness, and scale to your crowd. Despite its fancy look, the steps stay clear and achievable for confident beginners and experienced bakers alike.
Ingredients
Below are exact US and metric quantities to make a two-layer red velvet cake plus one cheesecake layer (serves 12–14).
Cheesecake Layer
24 oz (680g) cream cheese, softened: Creates creamy texture and tang.
1 cup (200g) granulated sugar: Sweetens and stabilizes.
3 large eggs (150g total): Adds structure.
1 cup (240g) sour cream: Supplies silkiness and slight tang.
1 teaspoon (5ml) vanilla extract: Enhances flavor.
Red Velvet Cake Layers
2 ½ cups (315g) all-purpose flour
1 ½ cups (300g) granulated sugar
2 tablespoons (10g) unsweetened cocoa powder
1 teaspoon (5g) baking soda
1 teaspoon (5g) fine salt
2 large eggs (100g)
1 ½ cups (360ml) vegetable oil
1 cup (240ml) buttermilk
2 teaspoons (10ml) vanilla extract
2 teaspoons (10ml) white vinegar
2 tablespoons (30ml) red food coloring gel or ¼ cup (60ml) liquid coloring
Frosting
16 oz (450g) cream cheese, softened
½ cup (115g) unsalted butter, softened
4 cups (480g) powdered sugar
2 teaspoons (10ml) vanilla extract
Pinch of salt
These measurements ensure a balanced flavor between tart cheesecake, sweet frosting, and moist red velvet cake.
Pro Tips
1. Bake the cheesecake ahead and chill fully.
Cold cheesecake assembles more cleanly and supports the cake layers. Bake it a day before you bake the cake layers. Let it cool in the pan, then refrigerate until firm. Cold cheesecake cuts neatly and won’t slide during stacking.
2. Level the red velvet layers.
Flat layers create a stable cake. After baking, cool layers completely and use a serrated knife or cake leveler to trim domes. This simple act gives your Red Velvet Cheesecake Layer Cake Recipe a professional look and helps frosting spread evenly.
3. Crumb coat before final frosting.
Apply a thin layer of frosting to seal crumbs. Chill the cake for 15–20 minutes. After chilling, apply the final coat for a smooth, bakery-style finish. This technique works great with any layered red velvet cake with cheesecake filling or similar variations because it prevents red crumbs from showing in the white frosting.
Instructions
(Step 1) Bake the cheesecake layer.
Preheat oven to 325°F (165°C). Line a 9-inch (23cm) springform pan with parchment and lightly grease the sides. Beat softened cream cheese and sugar until creamy. Add eggs one at a time, mixing briefly after each. Stir in sour cream and vanilla. Pour into the pan and smooth the top. Bake 45–55 minutes until the center jiggles slightly but edges look set. Turn off the oven and crack the door for 30 minutes to prevent cracking. Cool to room temperature, then refrigerate until firm, at least 4 hours or overnight.
(Step 2) Make the red velvet batter.
Preheat oven to 350°F (180°C). Grease two 9-inch (23cm) cake pans and line with parchment. In a large bowl, whisk flour, sugar, cocoa powder, baking soda, and salt. In another bowl, whisk eggs, oil, buttermilk, vanilla, vinegar, and red coloring. Slowly add wet mixture to dry mixture. Stir until smooth. The batter should look deeply red and slightly thick.
(Step 3) Bake cake layers.
Divide batter evenly into prepared pans. Smooth tops and tap pans lightly to release air bubbles. Bake 25–30 minutes until a toothpick inserted comes out clean. Cool in pans for 10 minutes, then invert onto cooling racks. Remove parchment and cool fully.
(Step 4) Prepare the frosting.
Beat softened cream cheese and butter together until smooth. Add powdered sugar gradually while mixing. Add vanilla and salt. Beat until fluffy and spreadable. If frosting feels soft, chill for 10–15 minutes before using.
(Step 5) Level and assemble.
Trim domes off both cake layers. Place the first red velvet layer on a cake board. Spread a thin layer of frosting over it to act as glue. Carefully release the cheesecake from the springform pan. Use a large spatula to transfer the cold cheesecake to the cake. Place cheesecake on top of the first layer. Spread another thin layer of frosting on top of the cheesecake. Position the second red velvet layer (cut side down for smoothness).
(Step 6) Crumb coat and chill.
Use an offset spatula to frost a thin coat over the entire cake. Chill 20 minutes so the frosting firms and traps crumbs. After chilling, apply a thick final coat. Smooth the sides and top. You can pipe borders or add red velvet crumbs for decoration.
(Step 7) Slice and serve.
Chill 30 minutes before slicing. Use a hot, clean knife for neat layers. Expect cheers when you reveal the dramatic red velvet cheesecake cake design inside. Enjoy immediately or store for later.
Variations
Chocolate Variation: Replace the red coloring with cocoa powder and add chocolate frosting instead of cream cheese frosting. This creates a decadent chocolate cheesecake layer cake with similar structure.
Mini Cake Version: Bake the recipe in three 6-inch (15cm) pans and a 6-inch cheesecake pan. This yields a tall, small-format cake that fits perfectly on intimate dessert tables for events or romantic dinners.
Dietary Tweaks: For gluten-free modifications, use a cup-for-cup gluten-free flour. For reduced sugar, choose a less sweet frosting and cut ¼ cup of sugar from the cheesecake mixture. Vegan swaps require more adjustments, but dairy-free cream cheese and almond milk yogurt can produce a similar layered effect if baked gently.
Storage/Serving
Refrigeration keeps everything fresh and maintains the integrity of the cheesecake layer. Store the assembled cake in an airtight cake carrier or wrap loosely in plastic film. The Red Velvet Cheesecake Layer Cake Recipe stays fresh for up to 5 days in the refrigerator. For longer storage, freeze slices individually. Wrap each slice in plastic film, then foil, and freeze up to 2 months. Thaw slices in the refrigerator overnight.
Serve chilled for clean layers or let sit 10–15 minutes at room temperature for a softer texture. Pair slices with coffee, espresso, or sparkling wine. For celebrations, garnish plates with raspberry coulis or chocolate sauce for contrast. Add edible flowers or red velvet crumbs for restaurant-style plating.
FAQs
Can I make the cheesecake layer ahead?
Yes. Make it a day or two in advance. It chills well and slices neatly.
What frosting works best?
Cream cheese frosting complements the tangy cheesecake and cocoa notes. Buttercream works too but tastes sweeter.
How do I get vibrant red color?
Use gel food coloring. Liquid coloring works but may require more volume and slightly thin the batter.
Can I halve the recipe for a smaller cake?
Yes. Use one 9-inch cake pan and halve the cheesecake and frosting amounts. Bake times will reduce slightly.
Do I need special equipment?
A springform pan helps with cheesecake removal. Offset spatulas and parchment paper simplify assembly, but you can complete the recipe with basic bowls, whisks, and pans.
This Red Velvet Cheesecake Layer Cake Recipe is comfort food at its finest — moist red velvet layers, silky cheesecake, and tangy frosting in every bite. It’s the kind of dish that transforms celebrations, impresses guests, and rewards anyone who loves both cake and cheesecake.